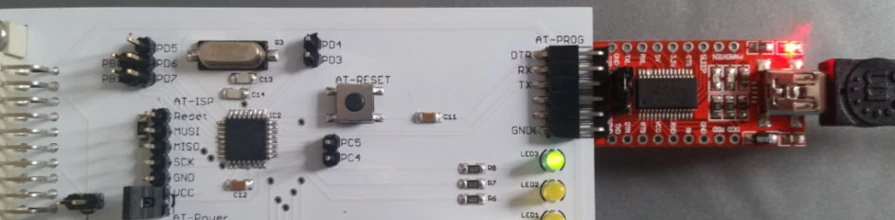
Auf manchen Platinen, die ich für meine Heimautomatisierung einsetze, befindet sich ein ATMega328P Mikrocontroller. Dieser kann entweder über die ISP-Schnittstelle oder deutlich einfacher über die serielle Schnittstelle programmiert werden.
Für die Programmierung über die serielle Schnittstelle muss vorher einmalig ein Bootloader auf den ATMega328P geflasht (programmiert) werden. Ich verwende hier den sehr verbreiteten Optiboot, welcher auch standardmäßig bei fast allen Arduinos zum Einsatz kommt.
Zum Flashen des Bootloaders und gleichzeitigen Setzen der richtigen Fuse- und Lockbits kommt ein Arduino Nano zusammen mit dem Atmega Board Programmer aus den arduino_sketches zum Einsatz.
Verkabelung
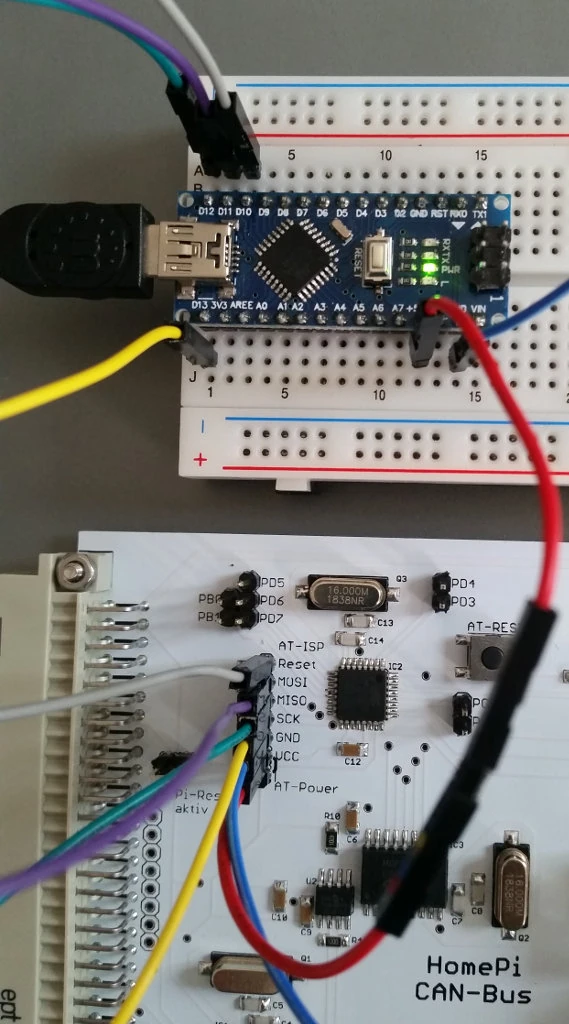
Die Verkabelung zwischen dem Arduino Nano und dem zu flashenden ATMega328P erfolgt wie bereits im Beitrag Arduino als ISP-Programmer und unten in der Tabelle beschrieben.
Am SPI-Bus des ATMega328P sollten beim Flashen möglichst keine weiteren ICs angeschlossen oder aktiv sein, da dies den Flashvorgang stören könnte.
Adruino Pin | ATMega328P Pin |
---|---|
D10 | Reset |
D11 | MOSI |
D12 | MISO |
D13 | SCK |
GND | GND |
+5V | VCC (nur wenn keine externe Spannung vorhanden) |
Atmega Board Programmer
Auf den Arduino Nano muss zunächst der Atmega Board Programmer geflasht werden.
Hierzu laden wir die aktuelle Version direkt aus dem arduino_sketches GitHub Repository herunter und öffnen davon das Verzeichnis Atmega_Board_Programmer in der Arduino IDE. Anschließend öffnen wir den Seriellen Monitor und stellen die Baudrate auf 115200 ein. Nun folgt der Upload des Programms auf den Arduino über den Hochladen-Button.

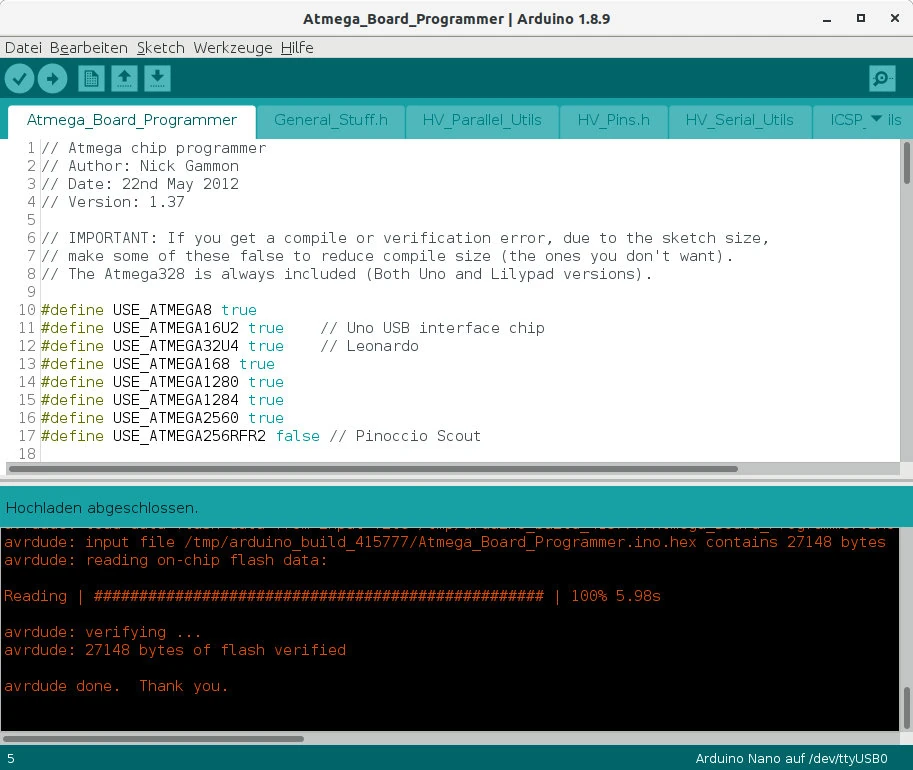
Nach dem erfolgreichen Hochladen sollte dann folgendes im Monitor erscheinen:

Flashen des Bootloaders
Zum Flashen des Bootloaders auf den ATMega328P tippen wir nun U
für 16 MHz ein und bestätigen mit Enter. Anschließend folgt ein G
zum Programmieren des Bootloaders.

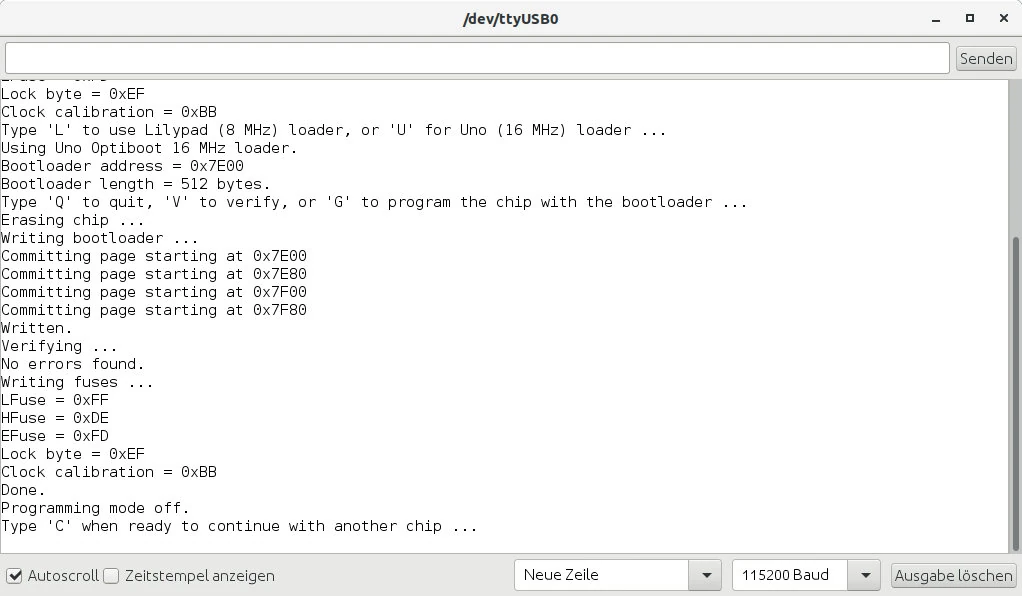
Damit ist der Optiboot Bootloader auf den ATMega328P geflasht und die Fuse- und Lockbits sind automatisch richtig gesetzt.
Überprüfen des Bootloaders
Zum Überprüfen des Bootloaders öffnen wir das Verzeichnis Atmega_Board_Detector aus den arduino_sketches und laden dieses Programm auf den Arduino hoch.
Die Ausgaben im Seriellen Monitor sollten dann wie folgt aussehen:
Atmega chip detector.
Written by Nick Gammon.
Version 1.20
Compiled on Aug 20 2019 at 12:44:43 with Arduino IDE 10809.
Attempting to enter ICSP programming mode ...
Entered programming mode OK.
Signature = 0x1E 0x95 0x0F
Processor = ATmega328P
Flash memory size = 32768 bytes.
LFuse = 0xFF
HFuse = 0xDE
EFuse = 0xFD
Lock byte = 0xEF
Clock calibration = 0xBB
Bootloader in use: Yes
EEPROM preserved through erase: No
Watchdog timer always on: No
Bootloader is 512 bytes starting at 7E00
Bootloader:
7E00: 0x11 0x24 0x84 0xB7 0x14 0xBE 0x81 0xFF 0xF0 0xD0 0x85 0xE0 0x80 0x93 0x81 0x00
7E10: 0x82 0xE0 0x80 0x93 0xC0 0x00 0x88 0xE1 0x80 0x93 0xC1 0x00 0x86 0xE0 0x80 0x93
[...]
7FF0: 0xFF 0x27 0x09 0x94 0xFF 0xFF 0xFF 0xFF 0xFF 0xFF 0xFF 0xFF 0xFF 0xFF 0x04 0x04
MD5 sum of bootloader = 0xFB 0xF4 0x9B 0x7B 0x59 0x73 0x7F 0x65 0xE8 0xD0 0xF8 0xA5 0x08 0x12 0xE7 0x9F
Bootloader name: optiboot_atmega328
First 256 bytes of program memory:
00: 0xFF 0xFF 0xFF 0xFF 0xFF 0xFF 0xFF 0xFF 0xFF 0xFF 0xFF 0xFF 0xFF 0xFF 0xFF 0xFF
[...]
F0: 0xFF 0xFF 0xFF 0xFF 0xFF 0xFF 0xFF 0xFF 0xFF 0xFF 0xFF 0xFF 0xFF 0xFF 0xFF 0xFF
Programming mode off.
Hochladen eines Programms auf den ATMega328P über den Bootloader
Ist der Bootloader auf den ATMega328P geflasht, dann kann ein beliebiges Programm über die serielle Schnittstelle auf den Mikrocontroller hochgeladen werden.
In der Adruino IDE muss dafür als Board dann Arduino/Genuino Uno (ATMega328, 16 Mhz) ausgewählt werden.
Anschließend sollte ein Hochladen über einen USB-TTL-Adapter problemlos funktionieren.

7. Dez. 2019 um 0:02
I did this operation (from an Arduino Uno to a Nano) and in the end, besides listing several errors, the result: Programming mode off.
What to say that?
Thank you
7. Dez. 2019 um 13:41
“Programming mode off” means only that the Atmega Board Programmer has left it’s programming mode. This is normal at the end of flashing.
Which errors occurred?
8. Dez. 2019 um 1:57
Here:
Atmega chip programmer.
Written by Nick Gammon.
Version 1.38
Compiled on Dec 7 2019 at 21:35:19 with Arduino IDE 10808.
Attempting to enter ICSP programming mode …
Entered programming mode OK.
Signature = 0x1E 0x95 0x0F
Processor = ATmega328P
Flash memory size = 32768 bytes.
LFuse = 0xFF
HFuse = 0xDA
EFuse = 0xFD
Lock byte = 0xFF
Clock calibration = 0xA9
Type ‘L’ to use Lilypad (8 MHz) loader, or ‘U’ for Uno (16 MHz) loader …
Using Uno Optiboot 16 MHz loader.
Bootloader address = 0x7E00
Bootloader length = 512 bytes.
Type ‘Q’ to quit, ‘V’ to verify, or ‘G’ to program the chip with the bootloader …
Erasing chip …
Writing bootloader …
Committing page starting at 0x7E00
Committing page starting at 0x7E80
Committing page starting at 0x7F00
Committing page starting at 0x7F80
Written.
Verifying …
Verification error at address 7E00. Got: 0x00 Expected: 0x11
Verification error at address 7E01. Got: 0x3F Expected: 0x24
Verification error at address 7E02. Got: 0x01 Expected: 0x84
Verification error at address 7E03. Got: 0x3F Expected: 0xB7
Verification error at address 7E04. Got: 0x02 Expected: 0x14
Verification error at address 7E05. Got: 0x3F Expected: 0xBE
Verification error at address 7E06. Got: 0x03 Expected: 0x81
Verification error at address 7E07. Got: 0x3F Expected: 0xFF
Verification error at address 7E08. Got: 0x04 Expected: 0xF0
Verification error at address 7E09. Got: 0x3F Expected: 0xD0
Verification error at address 7E0A. Got: 0x05 Expected: 0x85
Verification error at address 7E0B. Got: 0x3F Expected: 0xE0
Verification error at address 7E0C. Got: 0x06 Expected: 0x80
Verification error at address 7E0D. Got: 0x3F Expected: 0x93
Verification error at address 7E0E. Got: 0x07 Expected: 0x81
Verification error at address 7E0F. Got: 0x3F Expected: 0x00
Verification error at address 7E10. Got: 0x08 Expected: 0x82
Verification error at address 7E11. Got: 0x3F Expected: 0xE0
Verification error at address 7E12. Got: 0x09 Expected: 0x80
Verification error at address 7E13. Got: 0x3F Expected: 0x93
Verification error at address 7E14. Got: 0x0A Expected: 0xC0
Verification error at address 7E15. Got: 0x3F Expected: 0x00
Verification error at address 7E16. Got: 0x0B Expected: 0x88
Verification error at address 7E17. Got: 0x3F Expected: 0xE1
Verification error at address 7E18. Got: 0x0C Expected: 0x80
Verification error at address 7E19. Got: 0x3F Expected: 0x93
Verification error at address 7E1A. Got: 0x0D Expected: 0xC1
Verification error at address 7E1B. Got: 0x3F Expected: 0x00
Verification error at address 7E1C. Got: 0x0E Expected: 0x86
Verification error at address 7E1D. Got: 0x3F Expected: 0xE0
Verification error at address 7E1E. Got: 0x0F Expected: 0x80
Verification error at address 7E1F. Got: 0x3F Expected: 0x93
Verification error at address 7E20. Got: 0x10 Expected: 0xC2
Verification error at address 7E21. Got: 0x3F Expected: 0x00
Verification error at address 7E22. Got: 0x11 Expected: 0x80
Verification error at address 7E23. Got: 0x3F Expected: 0xE1
Verification error at address 7E24. Got: 0x12 Expected: 0x80
Verification error at address 7E25. Got: 0x3F Expected: 0x93
Verification error at address 7E26. Got: 0x13 Expected: 0xC4
Verification error at address 7E27. Got: 0x3F Expected: 0x00
Verification error at address 7E28. Got: 0x14 Expected: 0x8E
Verification error at address 7E29. Got: 0x3F Expected: 0xE0
Verification error at address 7E2A. Got: 0x15 Expected: 0xC9
Verification error at address 7E2B. Got: 0x3F Expected: 0xD0
Verification error at address 7E2C. Got: 0x16 Expected: 0x25
Verification error at address 7E2D. Got: 0x3F Expected: 0x9A
Verification error at address 7E2E. Got: 0x17 Expected: 0x86
Verification error at address 7E2F. Got: 0x3F Expected: 0xE0
Verification error at address 7E30. Got: 0x18 Expected: 0x20
Verification error at address 7E31. Got: 0x3F Expected: 0xE3
Verification error at address 7E32. Got: 0x19 Expected: 0x3C
Verification error at address 7E33. Got: 0x3F Expected: 0xEF
Verification error at address 7E34. Got: 0x1A Expected: 0x91
Verification error at address 7E35. Got: 0x3F Expected: 0xE0
Verification error at address 7E36. Got: 0x1B Expected: 0x30
Verification error at address 7E37. Got: 0x3F Expected: 0x93
Verification error at address 7E38. Got: 0x1C Expected: 0x85
Verification error at address 7E39. Got: 0x3F Expected: 0x00
Verification error at address 7E3A. Got: 0x1D Expected: 0x20
Verification error at address 7E3B. Got: 0x3F Expected: 0x93
Verification error at address 7E3C. Got: 0x1E Expected: 0x84
Verification error at address 7E3D. Got: 0x3F Expected: 0x00
Verification error at address 7E3E. Got: 0x1F Expected: 0x96
Verification error at address 7E3F. Got: 0x3F Expected: 0xBB
Verification error at address 7E40. Got: 0x20 Expected: 0xB0
Verification error at address 7E41. Got: 0x3F Expected: 0x9B
Verification error at address 7E42. Got: 0x21 Expected: 0xFE
Verification error at address 7E43. Got: 0x3F Expected: 0xCF
Verification error at address 7E44. Got: 0x22 Expected: 0x1D
Verification error at address 7E45. Got: 0x3F Expected: 0x9A
Verification error at address 7E46. Got: 0x23 Expected: 0xA8
Verification error at address 7E47. Got: 0x3F Expected: 0x95
Verification error at address 7E48. Got: 0x24 Expected: 0x81
Verification error at address 7E49. Got: 0x3F Expected: 0x50
Verification error at address 7E4A. Got: 0x25 Expected: 0xA9
Verification error at address 7E4B. Got: 0x3F Expected: 0xF7
Verification error at address 7E4C. Got: 0x26 Expected: 0xCC
Verification error at address 7E4D. Got: 0x3F Expected: 0x24
Verification error at address 7E4E. Got: 0x27 Expected: 0xDD
Verification error at address 7E4F. Got: 0x3F Expected: 0x24
Verification error at address 7E50. Got: 0x28 Expected: 0x88
Verification error at address 7E51. Got: 0x3F Expected: 0x24
Verification error at address 7E52. Got: 0x29 Expected: 0x83
Verification error at address 7E53. Got: 0x3F Expected: 0x94
Verification error at address 7E54. Got: 0x2A Expected: 0xB5
Verification error at address 7E55. Got: 0x3F Expected: 0xE0
Verification error at address 7E56. Got: 0x2B Expected: 0xAB
Verification error at address 7E57. Got: 0x3F Expected: 0x2E
Verification error at address 7E58. Got: 0x2C Expected: 0xA1
Verification error at address 7E59. Got: 0x3F Expected: 0xE1
Verification error at address 7E5A. Got: 0x2D Expected: 0x9A
Verification error at address 7E5B. Got: 0x3F Expected: 0x2E
Verification error at address 7E5C. Got: 0x2E Expected: 0xF3
Verification error at address 7E5D. Got: 0x3F Expected: 0xE0
Verification error at address 7E5E. Got: 0x2F Expected: 0xBF
Verification error at address 7E5F. Got: 0x3F Expected: 0x2E
Verification error at address 7E60. Got: 0x30 Expected: 0xA2
Verification error at address 7E61. Got: 0x3F Expected: 0xD0
Verification error at address 7E62. Got: 0x31 Expected: 0x81
Verification error at address 7E63. Got: 0x3F Expected: 0x34
Verification error at address 7E64. Got: 0x32 Expected: 0x61
504 verification error(s).
First 100 shown.
Programming mode off.
Type ‘C’ when ready to continue with another chip …
First I loaded the “Atmega Board Programmer” on the Arduino Uno board, then on the Serial Monitor it was followed with ‘U’ for Uno (16 MHz) loader, then G to load the Bootloader on Arduino Nano (connected as in schematic) but ended up with this report above.
8. Dez. 2019 um 18:23
Seems like the chip doesn’t accept/store the new program.
I had the same issue with one of my ATMega328P chips, but I still don’t know why.
Have you tried the same procedure using another arduino as target?
7. Jan. 2020 um 9:58
Hallo!
Ich beschäftige mich auch gerade damit, den Atmega nackt zu nutzen (ohne Arduino). Am Liebsten würde ich die ganzen Pin-Header sparen, weil sie Platz wegnehmen (Mein Projekt soll so klein wie möglich werden). Aber zumindest um den ISP-Anschluss werde ich wohl nicht drumrum kommen. Irgendwie muss das Ding ja programmiert werden.
Aber meine Frage: Was genau sind die Vorteile der seriellen Schnittstelle? Für mich bedeutet es weitere Pin-Header und den Programmer für die ISP-Schnittstelle habe ich ja – sonst könnte ich auch keinen Bootloader instalieren.
Wenn die Vorteile der seriellen Schnittstelle aber überwiegen würden…
Vielen Dank für deine Antwort!
Frank
7. Jan. 2020 um 11:22
Hallo Frank,
der größte Vorteil ist wohl, das man eben keinen ISP-Programmer mehr braucht, wenn ein mal der Bootloader drauf ist. Zum seriellen Programmieren werden dann auch nur noch 4 Leitungen (RX, TX, DTR, GND) benötigt, also schon mal eine weniger als beim ISP in Minimalbelegung.
Beim Programmieren über den Bootloader hat man zudem keinen Zugriff auf die Fuse-/Lock-Bits. Dies kann ein Vorteil sein, da man nicht aus Versehen die Bits überschreiben kann, oder auch ein Nachteil, wenn man diese eben ändern möchte.
Für eine ISP-Schnittstelle in möglichst kleinen Projekten such mal nach “PogoProg”. Das sind Adapter mit Federstiften, wodurch man auf der Platine nur noch kleine Pads braucht und sich somit die großen Pin-Header spart.
7. Jan. 2020 um 14:05
Hallo Peter,
vielen Dank für Deine Antwort. Wenn man die Argumente so zusammen liest, sind das schon schlagende Vorteile. Ich werde mal probieren, was mir besser gefällt. Mir kommt auch gerade eine Idee, wie ich den Bootloader vielleicht vor dem Löten auf den MC bekomme. Es gibt solche Adapter, wo ich den Chip reinlegen kann und ihn dann auf ein Breadboard o.A. stecken kann.
Die PogoPins kenne ich. Davon liegen hier auch schon einige bereit, um damit zu spielen. Da fehlt mir aber noch die richtige Idee, wie ich die an irgendwas befestige, um sie zu nutzen. Ich will mir eigentlich keinen “PCB-Turm” bauen, um den als Schablone zu haben. Ich würde es gern universeller haben, quasi als “Kontaktstecker”, den ich dann für alle Projekte einsetzen kann. Dann muss ich den halt mal eine Minute mit ruhigen Händen manuell auf die Platine drücken. Aber wie gesagt, mir fehlt noch die Idee, an was die genug halten.
Auf jeden Fall ein spannendes Thema. Vielen Dank, dass du dein Wissen so teilst.
Frank